-

-
Pre and Pro-Biotics for Horses
June 17 2020 -

5 Tips - Travelling long distances with a horse
June 17 2020 -
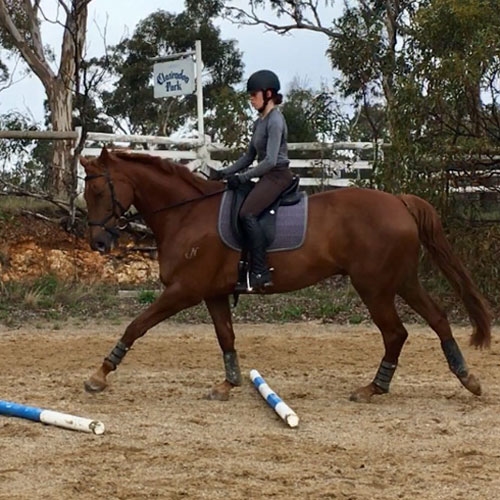
Equestrian Training - Pole and Cavelletti Exercises
June 17 2020 -
New Ariat Cambria
June 17 2020
Equestrian Training - Pole and Cavelletti Exercises
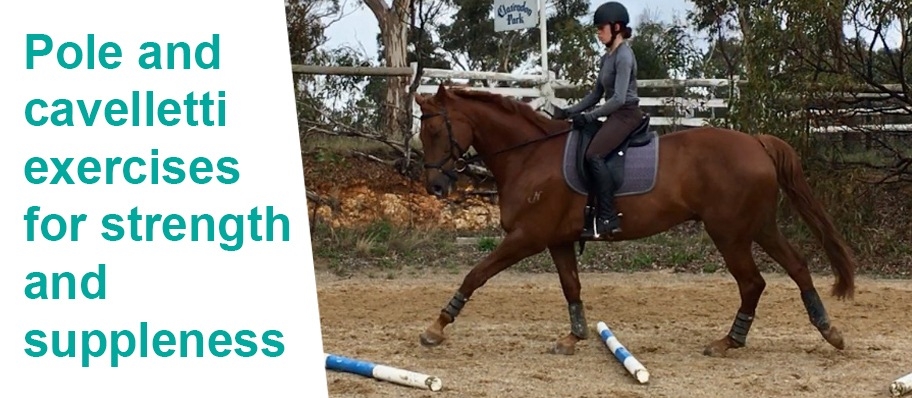
Poles and cavalletti are my best friend, and if they’re not yours, they should be! Aside from being a lifesaver when it comes to keeping the attention of young children and young horses, they’re invaluable for developing and progressing training.
For horses, they improve rhythm, balance and rideability; they improve range of motion in the joints, and they help build strength. For riders, they improve accuracy (if you ride a wonky line over poles, you’ll know about it!), they help you test your horse is traveling correctly, and if you jump, they’ll improve your eye for a distance.
While there is an infinite number of pole exercises out there, this article covers four simple but very effective exercises to help build strength and suppleness.
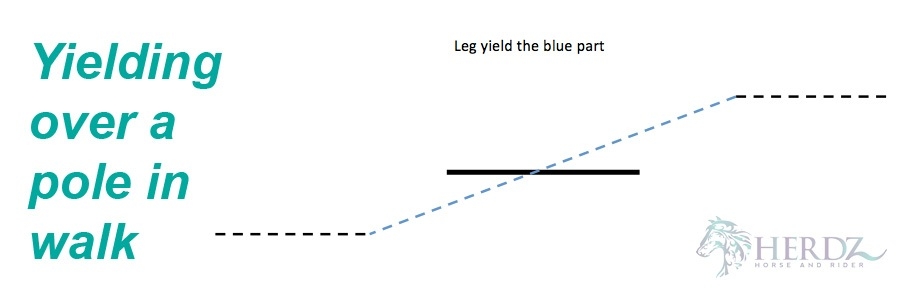
Yielding over a pole in walk
Purpose: Have you ever hopped on to find your horse is a little stiff and rigid, and you find you need to walk him for a while to loosen up? This is a great exercise to add into the early stages of your warmup, as it encourages your horse to use his legs and joints better, and to move off your inside leg.
Setup: A single pole on the ground (yes really…)
To ride it: Walk up to the right side of the pole, parallel to it. As you get close to the pole, ask your horse to yield off your right leg (not a true leg yield – you don’t have to have leg yield established to do this exercise). You may need to open the left rein to help. Ask him to go forward and sideways to move from the right side of the pole over to the left side. The forelegs will step across the pole just before the hindlegs. As the hindlegs step, use a little extra right leg or even tap with the whip on the right side to encourage him to pick up his right leg over the pole. The slight sideways movement combined with the extra lift required from the legs, shoulders and hips gently encourages your horse to use his body better. Once this is established, do the same from left to right, then continue to alternate direction.
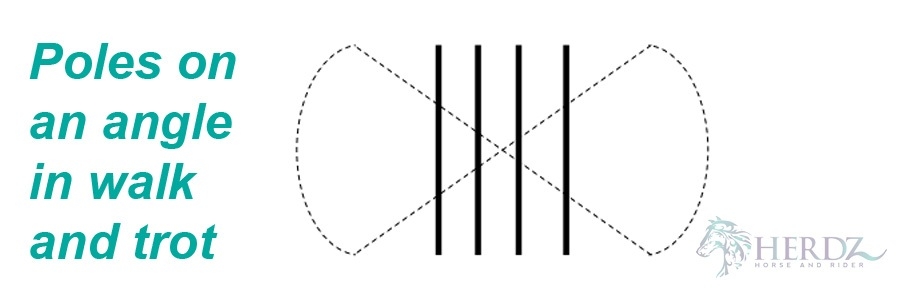
Poles on an angle in walk and trot
Purpose: Improve range of motion in walk and trot, and to test accuracy
Setup: Four poles, approximately 1.2 to 1.5m apart (depending on the size of your horse’s stride). In walk, do two steps instead of one.
To ride it: Approach the poles aiming from the right side of the first pole to the left side of the last pole. Find your line early, then eyes up, keep the rhythm and guide your horse straight on your line between your leg and hand. Make a half circle at the end and come back the other direction, riding left side to right side. For horses who are a little stiff or have limited range of motion in their shoulders and hips, angling the poles encourages them to reach as the angle makes the distance between the poles longer.
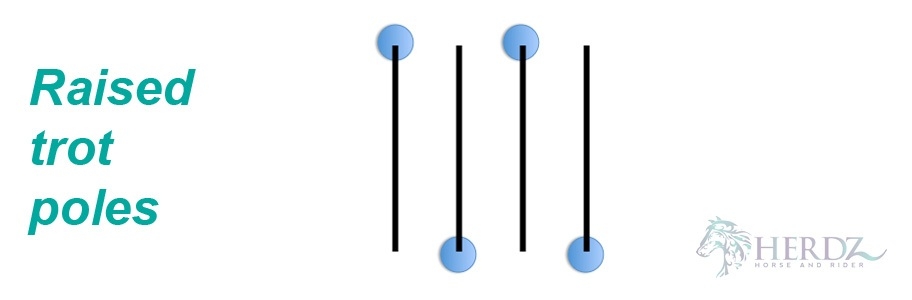
Raised trot poles
Purpose: To strengthening the ‘core’ (abdominals), engage the hindlegs, and encourage the horse to sit and wait
Set up: Four poles 1.2-1.5m apart (depending on horse’s stride length) with blocks or jump wings at alternating ends.
To ride it: There are many ways to progress this exercise, but with a green horse I like to begin by trotting over the poles on the ground to make sure the distance is comfortable and the horse is straight. Then, raise the alternating ends of the middle poles to introduce raised poles while the first and last poles are on the ground to help set up an ‘approach’ and ‘departure’. Once your horse is comfortable with this, raise all four poles.
Tip: This exercise will cause your horse to take bigger steps, which for some riders means they will get left behind. If this is happening, go into 2-point position as you trot the poles, and/or hold some mane to help keep your hands still and stay balanced
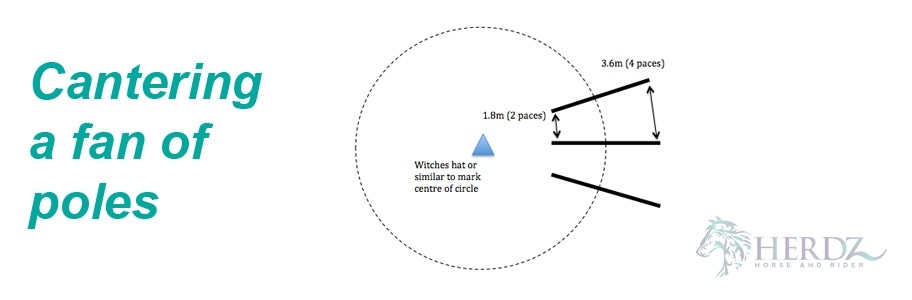
Cantering a fan of poles
Purpose: To strengthen and improve balance in the canter. It is also a good test to ensure your horse is between your inside leg and outside rein, and helps develop your eye for a distance.
Set up: Three poles in a fan shape, with the inside of the poles 1.8m (2 yards/paces) apart and the outside of the poles 3.6m (4 yards/paces) apart.
To ride it: First, to get your line, think of the centre of the poles being part of a circle you are riding, as per diagram. You can even put a cone in the centre of your circle to make sure you’re riding a nice even circle that takes you over the poles. If you’ve never ridden this exercise before, trot it a couple of times either way to establish your line. When trotting, ride two steps between each pole. To canter the exercise, establish a nice balanced canter, and make sure your horse is responding to your inside leg and straight on the outside rein. Canter around the poles, then bring your circle in smaller to the one you visualised that takes you over the poles. Keep your inside leg and outside rein to insist your horse goes over the centre of every pole – don't let him fall in or out! It may take a few goes to figure it out. Once you’ve ridden the smaller circle over the poles a couple of times, open up the canter onto a bigger circle around the poles, then ride it together, smaller circle and back over the poles. Once you’re doing this well, raise the poles on alternating ends.
Tip: Do you find it difficult to get a good distance to a pole in the canter? If so, as you canter towards the poles, instead of looking for your first pole, look for the spot after the first pole where the horse’s forelegs will land. Provided the canter is balanced and in front of the leg, you will find it much easier to get to the pole well this way.
Handy hints
• Using cavalletti:
If you don’t have pre-built cavalletti, the best way to make them is with the ShowMaster Jump Blocks. As well as being sturdy and safe, it is easy to adjust heights by laying them flat, on their sides or on their ends. Otherwise, you can always use jump wings to raise your poles - you may just find the rails getting knocked off the cups more than you’d like!
• Build up slowly:
Introduce exercises progressively; particularly if your horse finds them demanding. Unless your horse is experienced, always begin the exercises as poles on the ground before raising them.
• Include frequent rest breaks:
Doing pole exercises on a fatigued horse will cause more harm than good. Make sure you gauge how well your horse is coping and include a break whenever you think he needs one. If your horse is really struggling with an exercise, give him a break when there is even a small improvement, rather than waiting until he gets it right.
• Spend an even amount of time on each rein:
Make sure you do an even amount on each rein to equally develop both sides of the horse. As a general rule, for pole exercises on a straight line it is a good idea to track a different direction each time so the horse doesn’t begin to anticipate which way he is going.
• Use adequate leg protection:
There is an increased risk of a horse brushing, overreaching or banging a leg doing pole work, particularly if he is an uncoordinated youngster. Make sure you protect his legs with boots, or bandages if you know how to bandage. Check out the Herdz range of brushing boots and overreach boots to find your ideal boot.
How did you go?
I’d love to hear how you found the pole work exercises. If you have any questions or need some troubleshooting help with them, send me a message at Enya Crockford Equestrian.

Author’s Bio
Enya Crockford is an eventer and an EA Level 1 coach. She is passionate about developing horses and riders to the best of their abilities, and is always seeking out the best coaching for herself so she can pass it onto her students. She is currently campaigning two younger/inexperienced horses towards their first 1* starts.